
How to Update, Modify, and Resolve an iTop (helpdesk) REQUEST Ticket
This information may be outdated.
If you feel this is in error, please remove the {{outdated}} template.
A request has been made to delete this page.
If you feel this is in error, please remove the {{delete}} template.
This system is no longer used. Check the Talk “Issues and Requests” section for most Issues and/or Requests. Each committee has a group of ticket “Resolvers” who can view, modify, and resolve tickets in our new iTop (helpdesk) ticket system.
As a rule, the “Resolvers” are Committee Chairs, along with a few members who volunteer to help maintain equipment and supplies at the ‘Space.
See Screenshots below for a preview of the steps that Resolvers can take to update a REQUEST ticket in our new iTop (helpdesk) Ticket System.\
- To access the ticket system, go to: https://dallasmakerspace.org/helpdesk
- To log in, follow the instructions on the following link: https://dallasmakerspace.org/wiki/How_to_Enable_Your_Active_Directory_Login
- NOTE: After creating your account, it can take up to 12 hours for your account to sync over to the ticketing system.
How do I know if there is an open Request ticket that needs to be handled?
Section titled “How do I know if there is an open Request ticket that needs to be handled?”1. If you are a “Resolver”, you can log into the iTop (helpdesk) ticket system at any time to check on all open Request tickets.
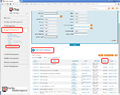
- Once logged into the ticket system, click on the “Request Management” option in the left sidebar, then click the “All open requests” option to view all Requests currently open.
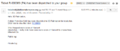
2. You receive a notification that a ticket has been dispatched to your group. Click on the ticket number (blue hyperlink) to view the ticket.
-
-
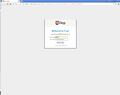
Log into the iTop (helpdesk) Ticket System
-
-
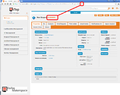
After logging in, the window will open directly to the ticket in the link you received in the e-mail message.
What do I do after I pull up a ticket to review?
Section titled “What do I do after I pull up a ticket to review?”1. In the top right corner, click the “Other Actions” button, then click “Assign”.
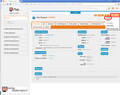
2. Click on the Agent Dropdown Menu and select yourself (or the person who will be handling the request and updating the ticket once resolved).
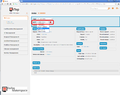
3. After selecting the person who will be handling the request, click on the “Assign” button under the Agent Dropdown Menu.
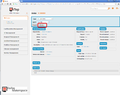
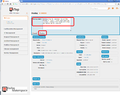
4. Click the “Other Actions” button again, then click “Pending”.

5. Enter a reason for Pending the ticket, then click the “Pending” button under the Pending Reason text box.
What if I want to track the tickets opened for a particular resource/tool?
Section titled “What if I want to track the tickets opened for a particular resource/tool?”You will want to attach a “CI” to the ticket.\
NOTE: A “CI” is a “configuration item” - which is a ticket-system way of saying a ‘resource’ or ‘tool’, as far as most of our tickets will be concerned.\
Examples: “3D Printer - Lefty”, “Toilet Paper”, “Laser - Lasersaur”, “JUMP”, “Paper Towels”, etc…\
Attaching a “CI” is a way to allow reports to be generated on tickets opened for a particular resource/tool. It’s not mandatory; but, could be helpful.\
If there are any resources/tools that you would like to have as an available “CI”, please open a ticket to request it/them be added. Thanks!\
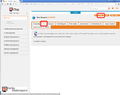
- Click the “CIs” tab in the orange area, then click the “Modify” button near the top right corner - to see if there are any applicable CIs available to add.
-
-
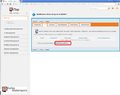
Click the “Add Functional CIs” button to bring up a search box to search for available CIs
-
-
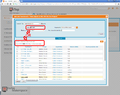
You can search OR browse through the available CIs to see if any are available for the resource the ticket is about.
-
-
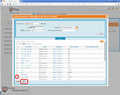
Put a checkmark in the box to the left of the CI if you find one that applies then click the “Add” button on the bottom.
-
-
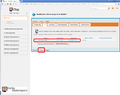
Confirm that the CI you selected shows up in the list then click the “Apply” button on the bottom.
How do I add notes or comments to the log files on a ticket?
Section titled “How do I add notes or comments to the log files on a ticket?”1. Click the “Modify” button near the top to be able to log comments on the ticket.
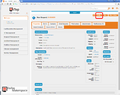
2. Scroll down if needed, then add notes to the ticket by logging comments in the appropriate section. Once you are sure you have the information entered correctly, click on the “Apply” button near the bottom to log the comment.\
NOTE: Comments cannot be edited or deleted after clicking “Apply”.\
Which section should I log the comments in?\
- Private Log: We don’t really use this field much. It’s typically only used to log technical issues with the ticket, etc… For updates to the request, please use the Public log.\
- Public Log: Most comments should be logged in the Public Log field.\
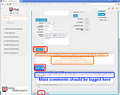
REMEMBER: Notes added by logging comments cannot be edited or deleted after clicking the Apply button.
How do I Resolve a Request Ticket?
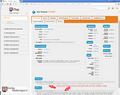
Section titled “How do I Resolve a Request Ticket?”1. To Resolve a ticket click the “Other Actions” button and select “Mark as resolved”, if the option is available.\
NOTE: If the option to “Mark as resolved” is not available, you will have to ‘assign’ the ticket to yourself - even if it’s already assigned to you.
(See the “What do I do after I pull up a ticket to review?” section above for refresher on how to assign the ticket to yourself, if needed.)
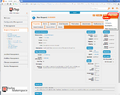
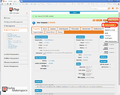
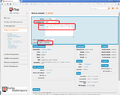
2. After selecting the option to “Mark as resolved” from the “Other options” menu, you will need to enter the solution, then click the “Mark as resolved” button below the text box to save the ticket as resolved.
Migrated from the legacy DMS wiki: original page